Customizing your WooCommerce store layout with Divi can significantly enhance user experience and boost conversion rates. One effective customization involves moving the “Add to Cart” button beneath the product image. This small but impactful change simplifies the purchasing process for customers and aligns the layout with intuitive shopping behavior.
This guide is specifically tailored for Divi users and WooCommerce store owners looking to optimize their online stores. Below, we provide a comprehensive step-by-step explanation of how to add the “Add to Cart” button underneath the product image in Divi, ensuring a professional and responsive design.
Read more : explain the difference between a theme and a template.
Why Customize the WooCommerce Layout?
Enhancing User Experience
The placement of critical elements like the “Add to Cart” button directly influences how users interact with your website. By positioning the button below the product image, you create a logical flow that mirrors the natural shopping behavior of viewing a product and then deciding to purchase.
Boosting Conversion Rates
A cluttered or unintuitive layout can deter potential buyers. Streamlining the interface ensures that users can focus on the product and take immediate action without unnecessary distractions. Research has shown that seamless design changes can significantly improve customer satisfaction and conversions.
Read more : supply chain attack
Audience Consideration
This guide is intended for WooCommerce store owners and Divi users who aim to build a visually appealing and functional e-commerce website. Whether you’re a beginner or have advanced knowledge of WordPress, the steps outlined below are easy to follow and implement.
How to woocommerce add to cart underneath the image divi Step-by-Step Guide
1. Prerequisites
Before making any changes, ensure you have the following tools:
- Divi Theme or Divi Builder: Installed and activated on your WordPress site.
- WooCommerce Plugin: A functional WooCommerce setup is required to manage your products.
- Code Editor: Tools like Notepad++, Visual Studio Code, or the Divi Theme Options interface for inserting code.
- Child Theme: If editing PHP files, always use a child theme to avoid overwriting changes during updates.
2. Access the Product Template in Divi
- Navigate to the Divi Theme Builder:
- From the WordPress dashboard, go to Divi > Theme Builder.
- Identify the product template or create a new one if necessary.
- Edit the Product Template:
- Select the product template to open it in the Divi Builder.
- This layout determines how individual product pages are displayed.
3. Add a Custom Code Module
- Insert a Custom Code Module:
- In the product layout editor, find the section under the product image.
- Add a new Custom Code Module below the image section.
Insert the Add to Cart Shortcode:
[add_to_cart id=”PRODUCT_ID”]
- Replace PRODUCT_ID with a dynamic function to ensure the button corresponds to the current product being viewed.
- Dynamic Customization with PHP
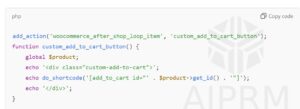
To make the button dynamic for all products, you need to add custom PHP code:
- Access Theme Editor:
- Go to Appearance > Theme Editor or use an external editor to modify your child theme files.
Modify functions.php: Add the following code to your child theme’s functions.php file:
-
- This function dynamically fetches the current product’s ID and inserts the “Add to Cart” button

.
- This function dynamically fetches the current product’s ID and inserts the “Add to Cart” button
Read more : wordpress reinstall theme
5. Adjust the Divi Styling
Once the button is in place, you may want to style it to match your site’s design:
- Using Divi’s Design Options:
- Open the Design tab of the Custom Code Module in the Divi Builder.
- Customize the layout, fonts, colors, and spacing as needed.
Add Custom CSS: For more control, include additional CSS in the Divi Theme Options or your child theme’s stylesheet:
css
Copy code
.custom-add-to-cart {
margin-top: 15px;
text-align: center;
}
.custom-add-to-cart a {
background-color: #007cba;
color: white;
padding: 10px 20px;
border-radius: 5px;
text-decoration: none;
}
-
- Adjust the colors and dimensions to align with your branding.
6. Test Your Changes
After implementing the customization, ensure everything works as intended:
- Preview the Product Page:
- Check that the “Add to Cart” button appears directly below the product image.
- Test Responsiveness:
- Verify that the design looks good on both mobile and desktop devices.
- Adjust padding, margins, or font sizes as needed for smaller screens.
- Check Functionality:
- Ensure the button links correctly to the cart and that users can complete purchases without issues.
Troubleshooting and FAQs
Why Isn’t the Button Displaying Correctly?
- Double-check the shortcode or PHP code for syntax errors.
- Ensure the Custom Code Module is placed in the correct section of the Divi Builder.
How Can I Make the Button Dynamic for All Products?
- Use the $product->get_id() function in the PHP code, as shown above, to dynamically fetch product IDs.
How to Revert Changes if Something Breaks?
- Always back up your site before making changes.
- If issues arise, restore the backup or use the Divi Theme Builder’s version history to revert edits.
Conclusion
By following this guide, you’ve learned underneath the image divi . This seemingly minor adjustment can have a substantial impact on user experience and sales performance.
For further exploration, consider experimenting with additional Divi customizations to refine your store’s appearance. If you’ve successfully implemented this guide, share your results with others or continue enhancing your site with advanced WooCommerce and Divi features.
if you want to know the more details about its click here
